Contour HD hands-free video camera review
Last week we covered the basics of helmet cams (or outdoor camcorders if you will), with a how-to guide of what you need to take high def video action. This week sees a review of one of the market leaders at the moment, the ContourHD hands-free video camera.
I have been interested in getting a hands-free camera for some time and it was a hard choice between the GoPro and Contour ranges. I did a lot of research and both are clearly excellent pieces of kit but each had strong and weak points, there was no clear winner; both could quite easily claim to be the poodle’s pendulums, but ultimately it depends on your specific use.
In the run-up to Christmas I noticed that the ContourHD prices started to fall… dramatically (they have since risen again) and so Santa filled my sack with an incredible bargain from Amazon marketplace.
The ContourHD can best be described as a lightweight wearable camcorder that on-the-go is incredibly easy to use with the minimum of fuss, but there is much more to it than that.
What is in the box ?
- Camera
- Battery
- Goggle mount and flat surface mount with spare flat surface mount sticker
- Two fixing tags (they attach the cam to the mount so in the unlikely event that it gets knocked out of the mount you do not lose it)
- 2GB microSD card with standard SD adapter
- USB cable (for charging and file transfer)
- Quick start guide
Note; Santa also gave me a 16GB class 6 microSD card.
The first thing that strikes you about the ContourHD is its size and weight. It is tiny, will fit into a 4”x2”x1” box and weighs only 4ozs.
To change the default settings requires Contour Storyteller which you download from the Contour website. Contour Storyteller allows you to setup the camera (I think I am still using the default except for the film quality switch), download your videos to your PC and upload them to the Contour user community site for viewing. I only use Contour Storyteller to change the camera settings.
Ease of Use
Out on the trail the ContourHD could not be easier to use as there are only three user controls.
One control is under the rubber cover; this slides up and down to let you select between low and high quality, this is set in Contour Storyteller and currently I have opted for WVGA and HD:720P/60fps. The other controls are external and are used when the cam is mounted; one is to switch the cam on/off (it will also switch itself off after 15 mins of inactivity), and the other is a larger sliding control on top that enables you to start and stop recording.
Both the external ones can be used easily on the trail, while riding, even on a cold frosty morning when wearing two pairs of gloves. Very nice.
Another neat touch are red lasers! The cam has a rotating lens, you can mount it at any angle, and every time you switch it on two red lasers light up for a short period enabling you to check that the lens is horizontal, unless taking videos with trees at 45 degrees is your thing.
Mounting the Contour HD camera
The included mounts are a flat surface mount and a goggle mount. The flat surface mount may suffice for – say – fixing the cam to the dashboard of your car or the side of a wardrobe(?) but the goggle mount will be the main one that I use.
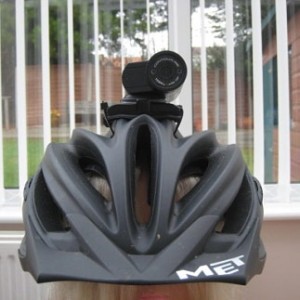
At first I thought; WTF ! is this all you get? but then I realised just how adaptive and flexible the goggle mount could be. By using cable ties, velcro strap or similar you open up numerous places to fix the cam. It is currently on my helmet but there are other locations on the frame where I can use this method to give a different perspective, the most obvious is forward facing on the steerer tube.
It’s not essential, but I also used pieces of old inner tube to keep the cam tight in the mount and to cushion and raise the mount on the helmet.
Contour HD video quality
The ContourHD uses the .mov format so if you are editing on a Mac then you are going to get better quality than via Windows and products like Windows Live Movie Maker due to conversion. Also bear in mind you always lose some quality when uploading as the bitrate gets reduced by hosting sites, more so with YouTube than with others.
The videos I have posted on YouTube so far are in WVGA and I think they look okay, but the playback on my PC with one at 720P/60fpsHD is superb.
Tips for using the ContourHD
The most important thing is getting the angle of the camera right, especially when it is mounted on your helmet. You will probably need to aim the camera above the horizontal to allow for the fact that even though you look forwards, you may well be leaning forward as well. E.g. in my deer video the cam is too low and I corrected it before the Swinley ride.
Be aware that the camera needs a short time to adjust when you go into the woods or move in or out of direct sunlight. The settings such as brightness and contrast can only be changed on a PC, so plan accordingly if these may need changing while away from your base.
General tips on recording with a helmet cam
- Cam shake is your enemy, so ensure that your cam is fixed tightly in the mount and the mount is fixed tight on your helmet or bike.
- Try to have an idea or theme or song in your mind first before recording as it will help you frame your shots.
- Mix short sections of film together, maybe with the same spot filmed from different angles or a mix of on and off-bike action. Try wide shots followed by close shots; above all, experiment!
- Try not to move your head around too much when filming (I am still learning this).
- Remember you are filming; staring too long at Dolly or Daisy will be noticeable on playback!
- If you are going to be editing before publishing keep footage short, it makes editing a lot easier to be working with smaller video files and does not affect final quality. Joining separate segments together is child’s play, because I can do it.
What next? Well, I’m still learning; when Spring gets here and with it hopefully dry trails, I intend to try 1080P, different mounts and filming in low light, plus get my head round working out what makes a great video.
Contour HD accessories
There are many after-sales accessories available; e.g. waterproof cases, different mounts etc. but be aware that some of them are expensive, so look for alternative options such as Velcro straps and cable ties; want an extra battery? – it is the same one as used in some Nokia phones for example.
Contour HD review summary
The ContourHD is a fantastic camera that has potential beyond just being a helmet cam. The main pros are; size, weight, ease of use and the rotating lens, but the payback is an inability to change settings like brightness without a PC.
Also note that the ContourHD would probably not be the best choice if a chest mount is a ‘must have’.
There are 11 comments on ‘Contour HD hands-free video camera review’
We love to get comments from our readers - if you've spent a few moments to comment, thank-you.
If you haven't had a chance yet, jump to our comments form if you have something to say.


Related: A guide to the buying the best helmet cameras | Muddymoles
tony says:
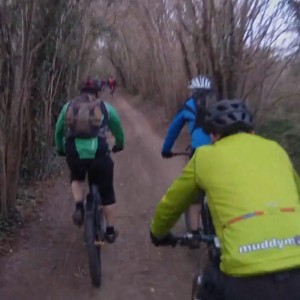
Hi Steve. The green contrast is too high on the ContourHD….oh no it just the new MuddyMoles tops 🙂
Add a new comment, or
Posted on February 2, 2012 at 12:05 pm
StevenD says:
I have noticed that the image quality on YT is definitely better where I have started from an MP4 source, so from now on I will edit footage from MP4 files recorded at 720P/60fps.
Add a new comment, or
Posted on February 13, 2012 at 1:25 pm
Related: GoPro Hero HD review – a wearable video camera for sport | Muddymoles
StevenD says:
Test film mounting the cam on the steerer tube. I was pleasantly surprised at the quality of picture as the two gulleys are very bumpy and attention grabbing in the dry with lots of loose flint and rocks. http://www.youtube.com/watch?v=dyDVZIvNAD8
Add a new comment, or
Posted on March 11, 2012 at 8:22 am
Matt says:
Nice video Steven, really stable and you get a real sense of speed. Can’t believe you hit 37mph on some of that stuff, especially with a great tree blocking the trail.
Nice natural berm too!
Add a new comment, or
Posted on March 11, 2012 at 10:32 pm
StevenD says:
Matt, thanks. That hill at Stonor is very steep and it surprises me each time I go down how much speed I carry, due mainly to a good surface on the steepest section.
Add a new comment, or
Posted on March 11, 2012 at 11:22 pm
Dandy says:
The challenge is on, Steven. 40mph has to be achievable 🙂 Ace looking berm 😉
Add a new comment, or
Posted on March 12, 2012 at 1:37 pm
StevenD says:
When it is bone dry and I have Crossmarks tyres on… we will see. If anyone is interested the OS map ref is SU 7400 8860.
Add a new comment, or
Posted on March 12, 2012 at 1:48 pm
TurnerGuy says:
I also have the mount for putting my Contour ROAM on the headtube – so good to see the results as I haven’t tried mine yet.
Add a new comment, or
Posted on March 12, 2012 at 5:41 pm
StevenD says:
Andrew, I just used the goggle mount that came with it and a couple of cable ties. In future I will use a velcro strap or similar and look at other fixing points.
Add a new comment, or
Posted on March 12, 2012 at 7:16 pm